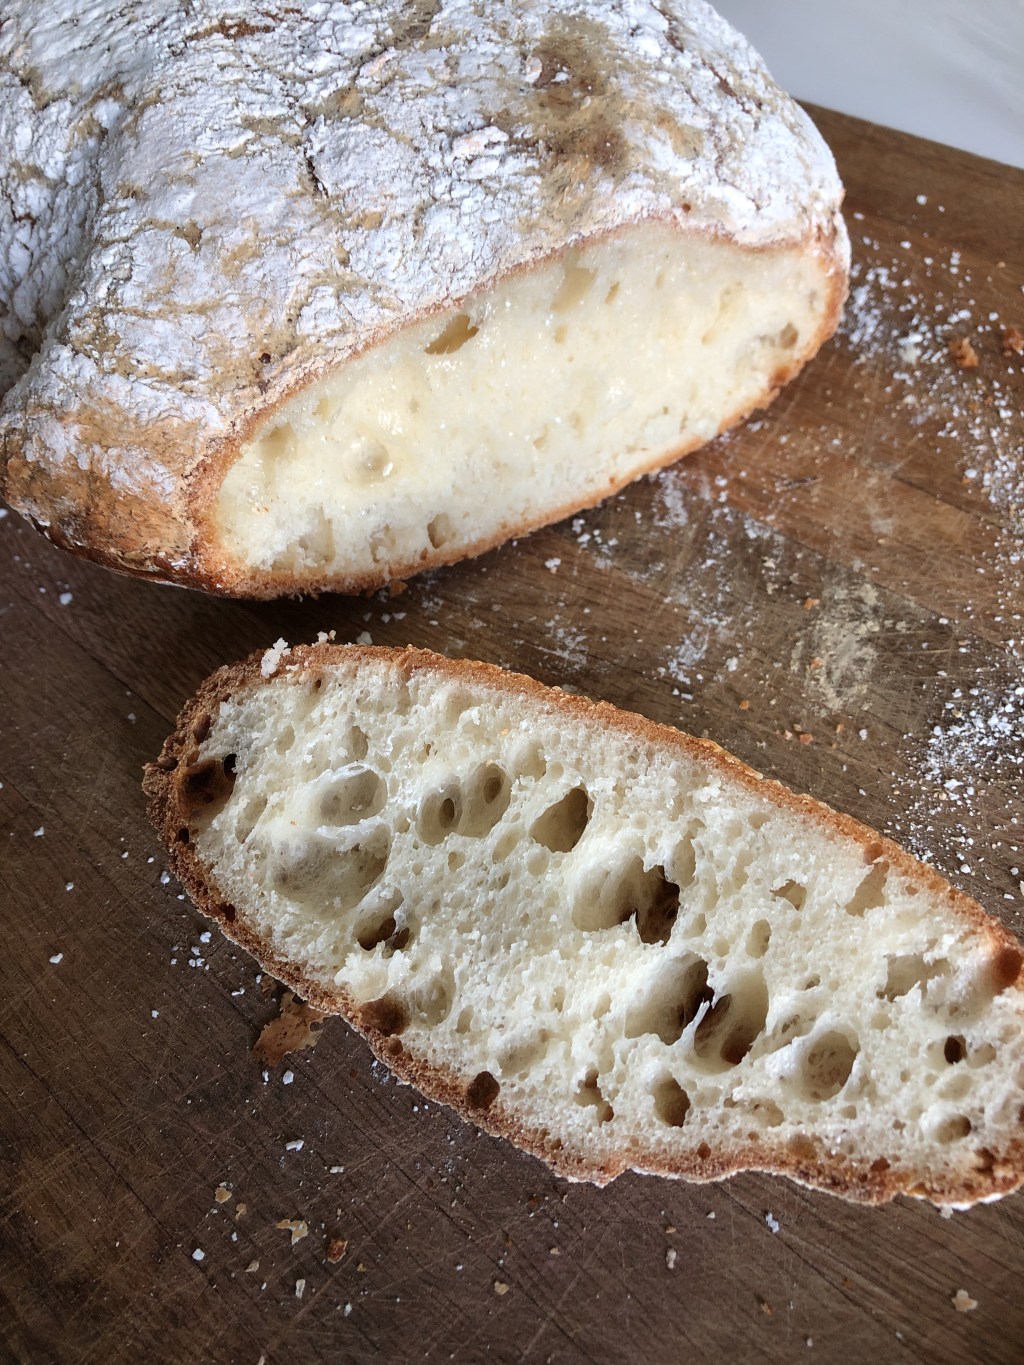
The Basic Plain White
Mix
- 3 dl water
- 1 teaspoon of maple syrup, sugar or honey
Let the sweetener dissolve, then vigorously whisk in
- ½ table spoon of psyllium
Let the psyllium thicken a bit (2-3 minutes) while you whisk the mix a few times to avoid clumps building up, then add
- 1 egg
- 1,5 dl sourdough starter
- 2 table spoons of vegetable oil
- 2 table spoons of pofibre (potato fibre for baking), can be skipped
Mix all ingredients well and sift in
- 6,5 dl gluten free flour
- 1 heaped teaspoon of fine grained sea salt
It is important to sift the flour, because it will otherwise be very difficult to work with, uneven and clumpy, making for a not so good bread. when the dough is mixed, with no clumps and relatively wet, set it aside for slow rising.
- 1,5 dl flour for handling the dough
Alternative 1 (with dry yeast)
- 1 sachet of dry yeast
- 1,5 dl water
Mix and wait until its frothing
Add:
- 1 dessert spoon physillium
Mix with whisk to avoid clumps
Add:
- 1 dl milk
- 0,5 dl of rapeseed oil
- 1,5 dl of relatively dense mature sourdough starter (equals 2,5 more liquidy starter)
- 6 dl gluten-free flour mix through mesh sieve
Mix well and quickly with spoon (don’t work the dough too much, just make sure it is mixed properly, as you do for English scones)
For rising and baking:
- ¾ dl gluten-free flour mix to coat the dough during cold rising (2 hrs)
- ½ dl gluten-free flour mix for forming the bread before warm rising (6-12 hrs)
Must be scored before baking to rise properly, using a VERY sharp knife (scoring knife, razor blade or paper cutter)
Alternative 2 (with rolled oats and walnuts)
Mix
- 1 teaspoon honey (sugar or maple syrup will do fine too)
- 3 dl water
- 1 ½ dl rolled oats
- 2 table spoons brown rice flour
- 1 ½ dl mature sourdough starter (if runny, reduce the water somewhat)
Set aside to soak the oats, 10-15 minutes
Add and mix
- 1 egg
- ½ dl vegetable oil
Add and mix in
- 6 dl flour
- 1,5-2 dl of roughly broken walnuts
- Optional: ½ dl linseeds, sunflower seed or other seeds
Have flour prepared for the handling of the dough through the first light kneading and the subsequent stretch and folds.
The dough will be quite loose, which is good, as the oats will absorb some of the water but not all. For a denser bread you can add more flour, but there are risks of under-baking involved when using oats (and oat flour). Do three stretch and folds with 40-60 minutes in between, sprinkling flour on the dough so you can handle it. Form it into a ball at the end of each stretch and fold. At the end of the third stretch and fold place the bread in the rising bowl (clad with a baking sheet) and let rest and rise for 10-12 hours depending on the heat in your kitchen. When baked let it cool upside-down.
Mixing in oats is a bit of a risk project, because the bread risk coming out dead baked and basically ready to be fed to the chickens, or the bin.
Method generally for gluten-free sourdough breads
Dissolve the syrup in the water, and whisk in the psyllium vigorously. Mix in the egg and the oil; then add the sourdough. You can now place the bowl in the stand mixer and turn it on the lowest capacity. Spoon feed the flour and the pofibre into the wet mixture until it has all been added while keeping the mixer on the lowest level.
If you prefer to do this by hand, it is easiest to just use a table spoon to work the dough until mixed and smooth, whether you choose to keep the dough relatively wet (makes a less dese bread) or adding more flour to get a dough more similar to wheat doughs.
Be careful to not over mix, just make sure it is all combined with no visible clumps. If your choice is a lighter bread keep the dough relatively wet and sticky, and mix it by hand with a table spoon. Your best choice is to pour it into a form lined with baking paper and set aside for rising, 10-24 hours at room temperature. When ready to bake, turn the oven to 230°C, stick a small dutch oven into the oven as it heats up, and then transfer the bread, by lifting it carefully by the baking paper from the form to the dutch oven. Use a sharp knife to quickly score it before you stick the lid on the dutch oven an out it back into the oven. Bake for 40 minutes, remove the lid and bake for another 10-15 minutes. Cool up-side-down on a cooling rack.
If you prefer a denser bread however, you would go for a somewhat les wet and not sticky dough, which means adding a bit more flour. If you use a stand mixer, stop it after 3-4 minutes and lift the mixer head, check that the dough is not too loose. It should be somewhat sticky but possible to handle without getting all covered by the dough. Use the extra amount of flour to lightly cover the dough while still in the bowl, form it with light movements to a ball and lift it carefully out of the bowl. Place it carefully in a breaded rising basket for fermentation, cover with a wet tea towel, a cap or cling film and place it in the fridge for longterm fermentation. It can stay in the fridge several days.
When ready to bake, bring the basket out of the fridge and let it sit on the kitchen table for 4-6 hours, preferably close to the stove top as you prepare food. Let it sit a couple of hours longer if room temperature is a bit on the low side. If you wish to bake the bread the same day you mix it, you skip the fridge fermentation.
Heat the oven to 200 to 210°C if using convection or 225 to 235°C normal oven temperature. Leave one of the baking sheets in the oven as it heats up or place a pizza stone on it to bake the bread. Use a cut-to-shape piece of baking sheet overlaying the basket and cover it with your hand to hold the bread when you carefully turn the bread out of the rising baseket. Gluten-free bread is more sensitive to handling than wheat-based bread so handle it with care. Make sure to score the bread when you have turned it out of the rising basket, and before you place it in the oven, to help it rise properly during baking.
